

The complete guide to building your personal self hosted server for streaming and ad-blocking.
Captain’s note: This OC was originally posted in reddit but its quality makes me wants to ensure a copy survices in lemmy as well.
We will setup the following applications in this guide:
- Docker
- AdguardHome - Adblocker for all your devices
- Jellyfin/Plex - For watching the content you download
- Qbittorrent - Torrent downloader
- Jackett - Torrent indexers provider
- Flaresolverr - For auto solving captcha in some of the indexers
- Sonarr - *arr service for automatically downloading TV shows
- Radarr - *arr service for movies
- Readarr - *arr service for (audio)books
- lidarr - *arr service for music
- Bazarr - Automatically downloads subtitles for Sonarr and Radarr
- Ombi/Overseer - For requesting movies and tv shows through Sonarr and Radarr
- Heimdall - Dashboard for all the services so you don’t need to remember all the ports
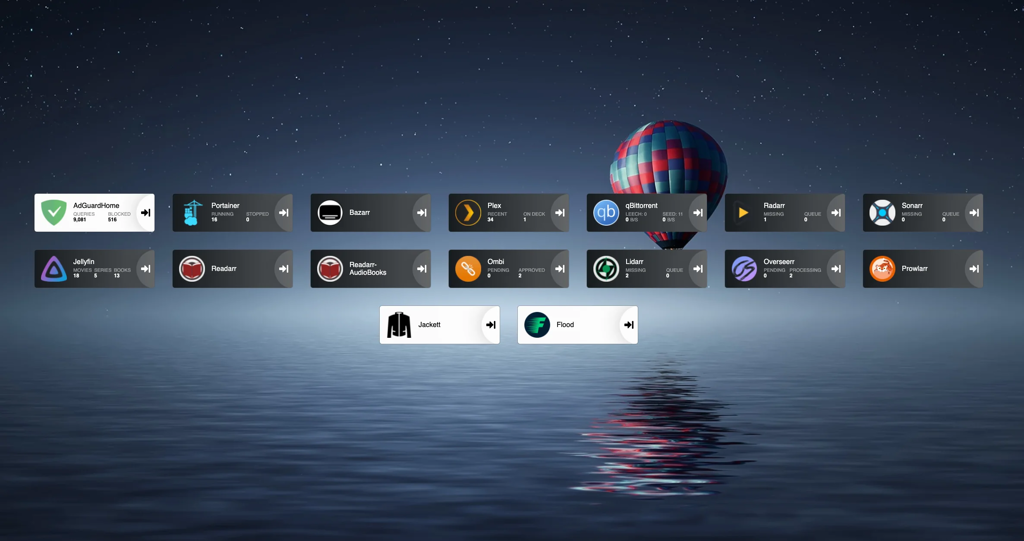
Once you are done, your dashboard will look something like this.
I started building my setup after reading this guide https://www.reddit.com/r/Piracy/comments/ma1hlm/the_complete_guide_to_building_your_own_personal/.
Hardware
You don’t need powerful hardware to set this up. I use a decade old computer, with the following hardware. Raspberry pi works fine.
Operating system
I will be using Ubuntu server in this guide. You can select whatever linux distro you prefer.
Download ubuntu server from https://ubuntu.com/download/server. Create a bootable USB drive using rufus or any other software(I prefer ventoy). Plug the usb on your computer, and select the usb drive from the boot menu and install ubuntu server. Follow the steps to install and configure ubuntu, and make sure to check “Install OpenSSH server”. Don’t install docker during the setup as the snap version is installed.
Once installation finishes you can now reboot and connect to your machine remotely using ssh.
ssh username@server-ip
# username you selected during installation
# Type ip a to find out the ip address of your server. Will be present against device like **enp4s0** prefixed with 192.168.
Create the directories for audiobooks, books, movies, music and tv.
I keep all my media at ~/server/media. If you will be using multiple drives you can look up how to mount drives.
We will be using hardlinks so once the torrents are downloaded they are linked to media directory as well as torrents directory without using double storage space. Read up the trash-guides to have a better understanding.
mkdir ~/server
mkdir ~/server/media # Media directory
mkdir ~/server/torrents # Torrents
# Creating the directories for torrents
cd ~/server/torrents
mkdir audiobooks books incomplete movies music tv
cd ~/server/media
mkdir audiobooks books movies music tv
Installing docker and docker-compose
Docker https://docs.docker.com/engine/install/ubuntu/
# install packages to allow apt to use a repository over HTTPS
sudo apt-get update
sudo apt-get install \
apt-transport-https \
ca-certificates \
curl \
gnupg \
lsb-release
# Add Docker’s official GPG key:
curl -fsSL https://download.docker.com/linux/ubuntu/gpg | sudo gpg --dearmor -o /usr/share/keyrings/docker-archive-keyring.gpg
# Setup the repository
echo \
"deb [arch=amd64 signed-by=/usr/share/keyrings/docker-archive-keyring.gpg] https://download.docker.com/linux/ubuntu \
$(lsb_release -cs) stable" | sudo tee /etc/apt/sources.list.d/docker.list > /dev/null
# Install Docker Engine
sudo apt-get update
sudo apt-get install docker-ce docker-ce-cli containerd.io
# Add user to the docker group to run docker commands without requiring root
sudo usermod -aG docker $(whoami)
Sign out by typing exit in the console and then ssh back in
Docker compose https://docs.docker.com/compose/install/
# Download the current stable release of Docker Compose
sudo curl -L "https://github.com/docker/compose/releases/download/1.29.2/docker-compose-$(uname -s)-$(uname -m)" -o /usr/local/bin/docker-compose
# Apply executable permissions to the binary
sudo chmod +x /usr/local/bin/docker-compose
Creating the compose file for Adguard home
First setup Adguard home in a new compose file.
Docker compose uses a yml file. All of the files contain version and services object.
Create a directory for keeping the compose files.
mkdir ~/server/compose
mkdir ~/server/compose/adguard-home
vi ~/server/compose/adguard-home/docker-compose.yml
Save the following content to the docker-compose.yml file. You can see here what each port does.
version: '3.3'
services:
run:
container_name: adguardhome
restart: unless-stopped
volumes:
- '/home/${USER}/server/configs/adguardhome/workdir:/opt/adguardhome/work'
- '/home/${USER}/server/configs/adguardhome/confdir:/opt/adguardhome/conf'
ports:
- '53:53/tcp'
- '53:53/udp'
- '67:67/udp'
- '68:68/udp'
- '68:68/tcp'
- '80:80/tcp'
- '443:443/tcp'
- '443:443/udp'
- '3000:3000/tcp'
image: adguard/adguardhome
Save the file and start the container using the following command.
docker-compose up -d
Open up the Adguard home setup on YOUR_SERVER_IP:3000.
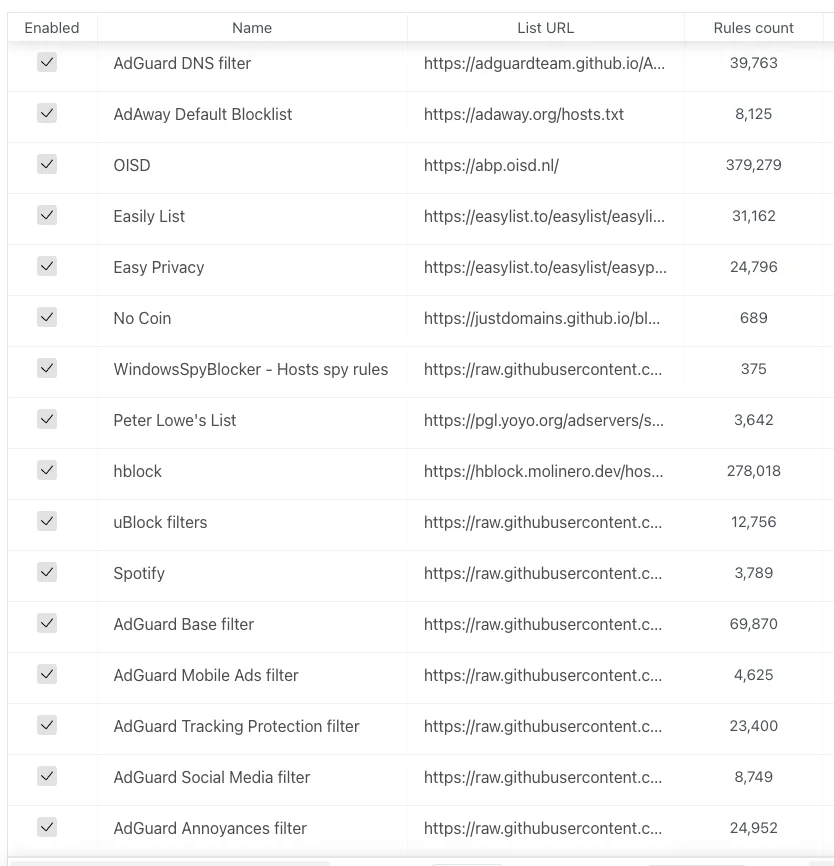
Enable the default filter list from filters→DNS blocklist. You can then add custom filters.
Creating the compose file for media-server
Jackett
Jackett is where you define all your torrent indexers. All the *arr apps use the tornzab feed provided by jackett to search torrents.
There is now an *arr app called prowlarr that is meant to be the replacement for jackett. But the flaresolverr(used for auto solving captchas) support was added very recently and doesn’t work that well as compared to jackett, so I am still sticking with jackett for meantime. You can instead use prowlarr if none of your indexers use captcha.
jackett:
container_name: jackett
image: linuxserver/jackett
environment:
- PUID=1000
- PGID=1000
- TZ=Asia/Kolkata
volumes:
- '/home/${USER}/server/configs/jackett:/config'
- '/home/${USER}/server/torrents:/downloads'
ports:
- '9117:9117'
restart: unless-stopped
prowlarr:
container_name: prowlarr
image: 'hotio/prowlarr:testing'
ports:
- '9696:9696'
environment:
- PUID=1000
- PGID=1000
- TZ=Asia/Kolkata
volumes:
- '/home/${USER}/server/configs/prowlarr:/config'
restart: unless-stopped
Sonarr - TV
Sonarr is a TV show scheduling and searching download program. It will take a list of shows you enjoy, search via Jackett, and add them to the qbittorrent downloads queue.
sonarr:
container_name: sonarr
image: linuxserver/sonarr
environment:
- PUID=1000
- PGID=1000
- TZ=Asia/Kolkata
ports:
- '8989:8989'
volumes:
- '/home/${USER}/server/configs/sonarr:/config'
- '/home/${USER}/server:/data'
restart: unless-stopped
Radarr - Movies
Sonarr but for movies.
radarr:
container_name: radarr
image: linuxserver/radarr
environment:
- PUID=1000
- PGID=1000
- TZ=Asia/Kolkata
ports:
- '7878:7878'
volumes:
- '/home/${USER}/server/configs/radarr:/config'
- '/home/${USER}/server:/data'
restart: unless-stopped
Lidarr - Music
lidarr:
container_name: lidarr
image: ghcr.io/linuxserver/lidarr
environment:
- PUID=1000
- PGID=1000
- TZ=Asia/Kolkata
volumes:
- '/home/${USER}/server/configs/liadarr:/config'
- '/home/${USER}/server:/data'
ports:
- '8686:8686'
restart: unless-stopped
Readarr - Books and AudioBooks
# Notice the different port for the audiobook container
readarr:
container_name: readarr
image: 'hotio/readarr:nightly'
ports:
- '8787:8787'
environment:
- PUID=1000
- PGID=1000
- TZ=Asia/Kolkata
volumes:
- '/home/${USER}/server/configs/readarr:/config'
- '/home/${USER}/server:/data'
restart: unless-stopped
readarr-audio-books:
container_name: readarr-audio-books
image: 'hotio/readarr:nightly'
ports:
- '8786:8787'
environment:
- PUID=1000
- PGID=1000
- TZ=Asia/Kolkata
volumes:
- '/home/${USER}/server/configs/readarr-audio-books:/config'
- '/home/${USER}/server:/data'
restart: unless-stopped
Bazarr - Subtitles
bazarr:
container_name: bazarr
image: ghcr.io/linuxserver/bazarr
environment:
- PUID=1000
- PGID=1000
- TZ=Asia/Kolkata
volumes:
- '/home/${USER}/server/configs/bazarr:/config'
- '/home/${USER}/server:/data'
ports:
- '6767:6767'
restart: unless-stopped
Jellyfin
I personally only use jellyfin because it’s completely free. I still have plex installed because overseerr which is used to request movies and tv shows require plex. But that’s the only role plex has in my setup.
I will talk about the devices section later on.
For the media volume you only need to provide access to the /data/media directory instead of /data as jellyfin doesn’t need to know about the torrents.
jellyfin:
container_name: jellyfin
image: ghcr.io/linuxserver/jellyfin
environment:
- PUID=1000
- PGID=1000
- TZ=Asia/Kolkata
ports:
- '8096:8096'
devices:
- '/dev/dri/renderD128:/dev/dri/renderD128'
- '/dev/dri/card0:/dev/dri/card0'
volumes:
- '/home/${USER}/server/configs/jellyfin:/config'
- '/home/${USER}/server/media:/data/media'
restart: unless-stopped
plex:
container_name: plex
image: ghcr.io/linuxserver/plex
ports:
- '32400:32400'
environment:
- PUID=1000
- PGID=1000
- TZ=Asia/Kolkata
- VERSION=docker
volumes:
- '/home/${USER}/server/configs/plex:/config'
- '/home/${USER}/server/media:/data/media'
devices:
- '/dev/dri/renderD128:/dev/dri/renderD128'
- '/dev/dri/card0:/dev/dri/card0'
restart: unless-stopped
Overseer/Ombi - Requesting Movies and TV shows
I use both. You can use ombi only if you don’t plan to install plex.
ombi:
container_name: ombi
image: ghcr.io/linuxserver/ombi
environment:
- PUID=1000
- PGID=1000
- TZ=Asia/Kolkata
volumes:
- '/home/${USER}/server/configs/ombi:/config'
ports:
- '3579:3579'
restart: unless-stopped
overseerr:
container_name: overseerr
image: ghcr.io/linuxserver/overseerr
environment:
- PUID=1000
- PGID=1000
- TZ=Asia/Kolkata
volumes:
- '/home/${USER}/server/configs/overseerr:/config'
ports:
- '5055:5055'
restart: unless-stopped
Qbittorrent - Torrent downloader
I use qflood container. Flood provides a nice UI and this image automatically manages the connection between qbittorrent and flood.
Qbittorrent only needs access to torrent directory, and not the complete data directory.
qflood:
container_name: qflood
image: hotio/qflood
ports:
- "8080:8080"
- "3005:3000"
environment:
- PUID=1000
- PGID=1000
- UMASK=002
- TZ=Asia/Kolkata
- FLOOD_AUTH=false
volumes:
- '/home/${USER}/server/configs/qflood:/config'
- '/home/${USER}/server/torrents:/data/torrents'
restart: unless-stopped
Heimdall - Dashboard
There are multiple dashboard applications but I use Heimdall.
heimdall:
container_name: heimdall
image: ghcr.io/linuxserver/heimdall
environment:
- PUID=1000
- PGID=1000
- TZ=Asia/Kolkata
volumes:
- '/home/${USER}/server/configs/heimdall:/config'
ports:
- 8090:80
restart: unless-stopped
Flaresolverr - Solves cloudflare captcha
If your indexers use captcha, you will need flaresolverr for them.
flaresolverr:
container_name: flaresolverr
image: 'ghcr.io/flaresolverr/flaresolverr:latest'
ports:
- '8191:8191'
environment:
- PUID=1000
- PGID=1000
- TZ=Asia/Kolkata
restart: unless-stopped
Transcoding
As I mentioned in the jellyfin section there is a section in the conmpose file as “devices”. It is used for transcoding. If you don’t include that section, whenever transcoding happens it will only use CPU. In order to utilise your gpu the devices must be passed on to the container.
https://jellyfin.org/docs/general/administration/hardware-acceleration.html Read up this guide to setup hardware acceleration for your gpu.
Generally, the devices are same for intel gpu transcoding.
devices:
- '/dev/dri/renderD128:/dev/dri/renderD128'
- '/dev/dri/card0:/dev/dri/card0'
To monitor the gpu usage install intel-gpu-tools
sudo apt install intel-gpu-tools
Now, create a compose file for media server.
mkdir ~/server/compose/media-server
vi ~/server/compose/media-server/docker-compose.yml
And copy all the containers you want to use under services. Remember to add the version string just like adguard home compose file.
Configuring the docker stack
Start the containers using the same command we used to start the adguard home container.
docker-compose up -d
Jackett
Navigate to YOUR_SERVER_IP:9117
Add a few indexers to jackett using the “add indexer” button. You can see the indexers I use in the image below.
Qbittorrent
Navigate to YOUR_SERVER_IP:8080
The default username is admin and password adminadmin. You can change the user and password by going to Tools → Options → WebUI
Change “Default Save Path” in WebUI section to /data/torrents/ and “Keep incomplete torrents in” to /data/torrents/incomplete/
Create categories by right clicking on sidebar under category. Type category as TV and path as tv. Path needs to be same as the folder you created to store your media. Similarly for movies type Movies as category and path as movies. This will enable to automatically move the media to its correct folder.
Sonarr
Navigate to YOUR_SERVER_IP:8989
- Under “Download Clients” add qbittorrent. Enter the host as
YOUR_SERVER_IPport as**8080,** and the username and password you used for qbittorrent. In category typeTV(or whatever you selected as category name(not path) on qbittorent). Test the connection and then save. - Under indexers, for each indexer you added in Jackett
- Click on add button
- Select Torzab
- Copy the tornzab feed for the indexer from jackett
- Copy the api key from jackett
- Select the categories you want
- Test and save
- Under general, define the root folder as
/data/media/tv
Repeat this process for Radarr, Lidarr and readarr.
Use /data/media/movies as root for Radarr and so on.
The setup for ombi/overseerr is super simple. Just hit the url and follow the on screen instructions.
Bazarr
Navigate to YOUR_SERVER_IP:6767
Go to settings and then sonarr. Enter the host as YOUR_SERVER_IP port as 8989. Copy the api key from sonarr settings→general.
Similarly for radarr, enter the host as YOUR_SERVER_IP port as 7878. Copy the api key from radarr settings→general.
Jellyfin
Go to YOUR_SERVER_IP:8096
- Add all the libraries by selecting content type and then giving a name for that library. Select the particular library location from
/data/media. Repeat this for movies, tv, music, books and audiobooks. - Go to dashboard→playback, and enable transcoding by selecting as
VAAPIand enter the device as/dev/dri/renderD128
Monitor GPU usage while playing content using
sudo intel_gpu_top
Heimdall
Navigate to YOUR_SERVER_IP:8090
Setup all the services you use so you don’t need to remember the ports like I showed in the first screenshot.
Updating docker images
With docker compose updates are very easy.
- Navigate to the compose file directory
~/server/compose/media-server. - Then
docker-compose pullto download the latest images. - And finally
docker-compose up -dto use the latest images. - Remove old images by
docker system prune -a
What’s next
- You can setup VPN if torrents are blocked by your ISP/Country. I wanted to keep this guide simple and I don’t use VPN for my server, so I have left out the VPN part.
- You can read about port forwarding to access your server over the internet.
everything goes somewhere, and i go everywhere.
Bookmarked and will try to install on Saturday. Do I need a specific server or can I just do this on my dezktpt?
Anywhere you have docker. I run it on my NAS.
I am currently too stupid to be able to follow this guide, but I will bookmark it for when I am better educated on how computer do.
Thank you for preserving this resource!
Go follow a basic Linux cli guide for 30 minutes and that’s all you need to be able to follow this guide other than potentially googling what certain commands do.
This is a beautiful guide. thank you so much for taking the time!
And now all of this, but in nixos 🤔
I’ve never used nixos but with nixos would it be possible to do all that with just the configuration file ?
Yes, without any docker, or with docker if you like
But really the point is not to use docker, you just write an additional configuration file for the service you want. It looks like docker-compose but shorter, and you already have everything preconfigured (db, users, storage, etc)
Docker is not safe if not ran rootless. With nixos you can write a docker-compose-like file for the service to be docker/podman/baremetal/VM/anything
And you can find all the parameters/env variables on https://search.nixos.org/options?channel=23.05&from=0&size=50&sort=relevance&type=packages&query=Nextcloud
This search is for nextcloud, you can not only install the app and specify the login and password, but specify things like installed apps, default files, themes, which reverse proxyto use, and whether use some rules/headers/filtering
Like that nixos is the future, really
Nixos is great but really it has its learning curve.
Docker-Compose is more friendly because all people use it.
I use NixOs and it’s beautifull
It’s going to be about as popular as Kubernetes for general use.
I’ll need to take a closer look at this later.
Definitely saving this for later. Thanks!!!
Thank you for putting in the effort!
Yet… I don’t get why using the *Arr stack and Plex is so popular. Plex is annoying as fuck and tries to shill you their paid bullshit at every corner. The Arr stack is buggy and having a separate system for recommendations and requests and for library management is super cumbersome for me. Compare that with Stremio… I could never convince the wife to use Plex with overseer at all. Stremio is super convenient.
Im just saying this because I spent my weekend getting another Arr stack running after years of absence and noticed that the whole thing is as convoluted and fiddly as ever and that really got me wondering why people just take this as the industry standard for torrenting.
Arr and stremio serve different purposes. If you just want to watch content yourself then do stremio.
If you want to keep certain movies yourself and want to supply a streaming service to friends and family then arr is better.
Arr has ability to watch your content with no internet.
If your into foss software arr is also way to go
Because if you are using Stremio (without Debris) sometimes you have to wait a long time for it to download the torrent and sometimes it doesn’t even load. I use Stremio when I want to watch the first episode of something and if I decide I want to watch the rest I add it trough Sonarr
I wasn’t doing the whole “self host thing”, and just running things as needed, but I still got to a point where I questioned why I needed those for. I basically could do things faster by just manually searching on qBit’s external gui attached to Jackett’s trackers. The extra *arr step just made it more fiddly to setup, and gave me less control on the output.
I’d love to have an effort-thread about Streamio if you’re willing to write one
I might just do that when I find the time. It’s way too unknown imho. Yes, it’s not the right choice if you want to keep everything you watched, but for everything you want to watch once and be done with, it’s a better solution in my opinion.
Thanks for putting this together. I am currently looking to build a self hosted media server and I think you may have just convinced me to go with the build you wrote up
I loved XBMC when it was a MC for XB lol. I agree about Plex though. I have to tie into your servers for my own personal use? No thank you!
On AndroidTV, Kodi (formerly XBMC) with the Jellyfin addon (or Jellycon addon if you’re only casting from another client, and don’t need to sync the libraries) is still a much better video player than the Jellyfin app for AndroidTV imo. It’s more versatile regarding video codecs, and so much more customizable. Also, I really like the Arctic Zephyr skin!
People keep saying this about Plex, yet I’ve received one pop up about paying them during the last 6 months. That was while I tried to use a pay feature. Not once otherwise.
There are plenty of apps that I can’t use due to their annoyance when you’re in the free tier. Plex have not bothered me in the least.
Why am I not using streamio? Well, we have an Apple TV so that’s tough. Might get something else down the line, but I pirate to save money, not to save money on entertainment and spend it on equipment instead.
It’s not just popups, it’s the irrelevant bullshit that clutters up the UI.
It’s that they’re “pushing”. A lot of people have an inherent dislike of having shit pushed on them, regardless of how extreme or avoidable it is. Plex absolutely pushes their services in the way they design their UI.
It’s your library, afterall. It’s your computer doing the work, your Internet connection being streamed from, your network it’s running on. It’s not unreasonable to want your library to not be put next to garbage you didn’t put there.
Also, your kidding yourself if you don’t think Plex is going to get progressively worse and more pushy. They are on a very clear trajectory, it’s just a matter of time.
Why I am not using Plex:
- It kept adding its own menu items / sections to my home screen with its shilled content like some annoying TV streams etc. Ever so often after updates etc it would keep adding it back
- It phones home
- Their servers has been hacked at least two times
- They dealt poorly with the hacks so I don’t trust them to know anything about my content or usage
Their last hack was the straw for me. I have a lifetime Plex Pass. I still refuse to use Plex anymore.
Curious, when did they handle hack poorly?
From my experience, their communication about the last security breach was slow, lackluster and left me wanting. End result was that I did no longer trust them. In reality I may have been biased and already subconsciously made up my mind about their trustworthiness. Everyone have to make their own opinion and decisions.
Are you referring to the one that lastpass blamed their own lean on? Which turned out to be a 5 year old, long fixed CVE?
lol that’s funny, didn’t know that was the cause for the latest LastPass breach. I just noped tf out of LastPass after that without looking back.
No I was just referring to their breach in August 2022 where I guess I was annoyed that they didn’t just invalidate/reset everyone’s password immediately. Instead, everyone had to try do to it on their servers, which couldn’t handle the traffic, so then a lot were either unable to reset password, unable to set new one, unable to reclaim server etc.
Also, when trying to calm us with mentioning everything they didn’t think was affected by the breach, it just made me realize that I’m done letting a company like Plex have all that data available to me.
Finally, they have to my knowledge still not acknowledged how the breach took place, just that they have taken steps to avoid it in the future.
With the Arr stack I like that I can select which torrents I want to download. I don’t know if that’s possible with Stremio?
Also it doesn’t seem streamio is available for Apple TV. I would give it a try otherwise
You can select which torrent you use with Stremio
Ive been using free plex for years and ive not seen a peep about paying for anything… except on the login screen whomich i rarely see.
I have a browser shortcut directly to my video content sorted into folders.
Nice guide! However, I’ve always wondered if all of these even make sense. Like, can’t you just stream from the internet? I understand having thing on your physical storage device is an extra degree of freedom but it’s very rare for me watching something more then once. Also while you can technically run it off a Raspberry Pi, it’s not really recommended and you would need a separate PC which just adds to the cost. Meanwhile, with a simple app like Cloudstream, you can just get whatever you want whenever you want. The only advantage I see of the *arr +media server approach is not needing to connect to a VPN.
EDIT: After reading the replys just realized I should have specified by streaming sites I mean the shady ones, in my country we use different words and I see how that can confuse some people
- You will probably not reach the level of quality with something like a pirate hoster.
Either the content will have a lower bitrate or lower resolution. - Foreign dub is hard to come by in decent quality.
- Yes storage and compute is surely more expensive but for some it’s a hobby and a learning experience
- You will probably not reach the level of quality with something like a pirate hoster.
Personally I just think it’s easier to pick out the movies and shows I want to watch, and then be sure that they will be there once I sit down to watch them. No uncertainty, no hunting down a good stream or missing episode, everything is just there and ready. The process is very simple once everything is set up, and you can still delete video files after you watch them if you want to.
- You can’t actually own movies anymore unless you buy physical copies (which are subject to damage over time).
- You’re dependent on someone else’s servers to stream the movies.
- The providers can and have removed movies you’ve paid for.
- Not dependent on your internet connection, which can be unreliable for many.
I meant free streaming sites with reuploads, but the other point still stand strong, thanks
The nature of pirating means that specific media/torrents/indexes/domains are frequently down or unavailable. A solution today might be taken down or raided by authorities tomorrow.
It’s just a little more stable/redundant to have media stored locally. Plus, by streaming from something like cloud stream, you’re not contributing to torrent seeding, not to mention that a turnkey solution is a large target for authorities, so it’s possible if not likely that it’ll stop working someday and you’ll have to find something else.
It’s not for everyone certainly, but if you can afford it it’s a nice solution.
I used to be in your camp, but then switched to plex setup etc.
Main reasons:
-
I’m seeing the trend of media being removed from people and I’m getting sick of it. I want my shit to be mine and available to me at a moments notice.
-
My collection basically exists if all top movies / shows that I can rotate watching.
-
It makes it so that my tech illiterate family can enjoy everything too without knowing how anything works.
-
I could cancel all those greedy corporate assholes splitting everything into a thousand services.
not discrediting you, this is just my point of view. Media being removed is in not really a problem on streaming sites since there’s usually many where you can watch the same thing, and as for point 4 streaming sites are basically the same.
I guess it’s just different usage because I don’t really like rewatching things and my family doesn’t usually watch movies/TV series.
So in the end the only thing I don’t like with how I do it is not being able to physically have the files
EDIT: I just realized I should have specified by streaming sites I mean the shady ones, in my country we use different words
-
It’s all about use case. You don’t rewatch shows or movies, so maybe storing media isn’t for you. I’m often rewatching or just having background stuff playing, so it’s nice having it available.
On top of that, I was tired of streaming services removing content. Netflix removing It’s Always Sunny actually got me started, and the subsequent removal of episodes from shows confirmed I made the right choice. I actually have control over my media, in that I can put a playlist of any number of shows together I want.
I have playlists for 70’s-80’s shows like The Brady Bunch, The A-Team, Knight Rider, just hit shuffle and it’s 1,000 episodes of random nostalgia. I can set up programs like DizqueTV and set up my own TV channels on top of this. Why pick and choose a show when TV can pick for me?
In regards to “the hardware” I ran my Plex server on a Pi3 for years. Unless you’re pushing 4k content or certain filetypes, the Pi is more than enough.
In addition to all this, I’m not reliant on my internet. If power goes out partially, I still have access to my hard drives and have always been able to pop on a show or movie while I clean up in the dark. Or sometimes the internet just goes out and it’s really nice being unaffected.
I think it’s been 7 or 8 years since I started in college, I’ve spent about $600 total on hard drives that I’m still using today? The money I’ve spent is invested into my server, rather than paying some service for something I can do myself. A service that has to submit to the will of the government, I was curious of the price range of Cloudstream and saw that they took the site and code down, so it’s just another streaming situation that’s no different, except the chance of payment being sent to the actual people who worked on the show is now completely gone. Even just $30/month after 5 years is $1,800.
I pirate content because I can’t trust Netflix/Hulu/Disney to not fuck with their content. So why would I pay another 3rd party to do the same thing? Moreover, when I subscribe to these streaming services I can contribute to the metrics to say, “Hey, I want more It’s Always Sunny after S14!”.
Finally - it’s a hobby as well. I like computers. Linux another the shit out of me but I’ve enjoyed setting up a server used for more than just media. On the Pi I would just search for what I wanted and add it as I see fit. Obviously, there’s the *arrs as well which can get it all automated for you. That’s a bit of setup on its own, but it’s fairly straightforward.
Wow, this is so detailed.
I was looking into setting up some stuff because it seems like a fun project to me, but it was very daunting.
Having it all here definitely helps a lot and gives me motivation to start.
Wow. This is great, but man that seems like a lot of points of potential failure. Helpful to have a guide but this remains intimidating to me.
Yeah, this is like someone asking “how can I watch free movies” and then someone replying with how to build a business plan to run a company that films and produces movies.
Just install Plex on any old hardware and open it up to remote access. Get a cheap pfsense firewall and create a forwarding rule. Download torrents with qbtorrent on the box running Plex and have Plex indexing that folder. It doesn’t have to be a million steps of highly complex stuff. Lastly get a pihole set up with one of the many guides out there and you have essentially the same thing as this long, terrifying guide but with was less points of failure.
The solution in this post is more complicated because it does more, and in an automated fashion, than your solution. Yours is simpler to set up, sure, but requires a lot of manual intervention to add content.
Once you go through the trouble of setting up the more complex solution, it pretty much takes care of itself, content-wise. It’s like your own self hosted Netflix/Hulu/Spotify/whatever else all in one.
Some people prefer your way, others prefer the more complicated way. I’m certainly glad someone has posted a guide, because either way I’m now aware of the steps involved and how big of an undertaking each solution will be, and can make an informed decision on which setup works for me.
Honestly, I agree with you.
Of course, if someone offered to come by my house and set this all up for free I wouldn’t say no, but nowadays with a fast enough internet connection and the right tracker you’re a few keystrokes and maybe 15 minutes away from any movie or TV series you might feel like watching.
The 15/20 minutes saved don’t justify the massive work and maintenance to keep this all running.
You can use the guide to install just Jellyfin and Qbittorrent.
You’ll have to do what the *arr are doing manually — search torrents yourself and track down each episode etc., then add them to Qbittorrent, then transfer the files to where Jellyfin expects them when they’re done downloading, look for subtitles etc.
It’s not as nice as the *arr setup because it can’t “take requests”, basically you have to be the one to get the stuff that your friends and family ask for and manage it with Jellyfin… on the other hand it’s much faster to get going — and you can always add *arr stuff later, one by one.
Nice. Just want to point out that there is jellyseerr for jellyfin as an alternative to overseerr.
There is also reiverr which is new which allows managing sonarr,radarr, and jellyfin (basically it providers an interface to watch jellyfin content and also add episodes and movies to sonarr/radarr. I use reiverr for me as admin but it doesnt do requests as of now so i keep jellyseerr for my users
There is also watchtower on docker that automatically updates your images
And finally there is rdt-client (real-debrid torrent client) which is a real debrid client that pretends to be qbittorrent and allows sonarr/radarr to download from real debrid instead of torrenting it
It sounds like you have enough changes to make a new more modern guide ;)
FYI Jellyseerr is a fork of Overseerr specifically for Jellyfin
Amazing guide!
I use minidlna, qbittorrent, qbittorrent-nox on a very old raspberry pi. A 4tb USB hard drive is attached via a powered hub. I can stream 4k Atmos using vlc installed on my “smart” tv. Can’t it be this simple? What’s the reason to dive into docker and plex?
Plex/Jellyfin is only needed if you need any of its features: remote access, ability to transcode (for reduced bandwidth when remote or when the client device doesn’t support the codec), showing the media as a “library”, search, last watched, ability to fetch information and subtitles about the media, per-user preferences and watch list etc.
You can also achieve some of these things with local apps like Kodi, Archos Player, BubbleUPnP etc. Or you can just do what you do and play files directly over a file share.
Docker helps you keep your main system much cleaner and helps with backups and recovering after failures/reinstall/upgrades.
With Docker the base OS is very basic indeed and just needs some essential things like SSH and Docker installed, so you can use a super reliable OS like Debian stable and not care that it doesn’t have super recent versions of various apps, because you install them from Docker images anyway.
The OS is not affected by what you install with Docker so it’s very easy to reinstall if needed, and you never have to mess with its packages to get what you want.
Docker also lets you separate the app files from the persistent files (like configs, preferences, databases etc.) so you can backup the latter separately and preserve them across reinstalls or upgrades of the app.
Docker also makes it very easy to do things like experiment with a new app, or a new version of an app, or run an app in an environment very unlike your base OS, or get back the exact same environment every time etc. All of these are classic problems when you run apps directly on the OS — if you’ve been doing that for a while you’ve probably run into some issues and know what I mean.
Docker eases the automated setup.
Yours surely does work but docker compose is really nice if you want to have multiple types of one thing on the same hardware (like 2 sonarr/radarr for 4K content).
Simply impossible with regular installs.
Also while yes it complicates somethings it also makes maintenance so easy with updates than anything else.
Remove the image and you are only left with files you put in /path/to/folder.
Remove a conventional program and you’d need to hunt down the files it created somewhere in the file structures like AppData or /opt and other folders.Can you elaborate on why you’d need two instances of radarr/sonarr running at once?
the option to have two instances is nice for maintenance stuff, e.g.
- you broke your instance and want to migrate to a fresh one
- you want to try out a new workflow/plugin/fork/version without committing to it
another benifit of containers:
- you can do desaster recovery on a single service without affect the other services on the same machine
- handling incompatable lib-versions becomes trivial. (e.g. two different php versions on the same machine is usually a pain).
(like 2 sonarr/radarr for 4K content).
Literally in the comment…
But they can pull different quality profiles based on your list preferences right? I don’t see why you need one instance for downloading 4k and one for 1080p.
Depends on the setup. Maybe you run everything off a raspberry pi and can’t afford to transcode 4k, so you have a separate 4k library for local users only. I could also see wanting to separate the volumes when you have multiple servers attached to a single NAS.
IDK, I don’t personally bother with 4k, but I imagine it’s a little more to manage if you’re sharing your media out with friends/family.
That is a cool option I hadn’t thought of trying.
I don’t do it but I read that those are the reason for doing it were having both versions side by side without trumping another and without doing a manual automatic transcode by something like plex/handbrake.
Or that you would do a separate 4K library so when you share the library with family the fanily will only watch content that fits in the upstream pipe and doesn’t transcode while you could watch crisp 4K content.


